

Are you one of the many marketers who use videos as part of your content marketing strategy? Then this is for you!
This step by step tutorial explains how you can use HubSpot's custom events feature to track your visitors' interactions with your embedded Youtube videos. Even better: it will automatically associate those interactions with your known contacts and you will be able to use them for segmentation (lists) and automation (workflows). This is the first part of a two-post series. In this tutorial, we'll take a look at how we can track the two most important video interactions:
- the 'play' button was clicked (= who watched the video at least to some degree)
- the video reached the end (= who watched the full video)
Pleas note that this tutorial requires coding knowledge or at least an understanding of code (but you don't need to be a developer) and HubSpot Marketing Enterprise.
What is a custom event and what can it be used for?
Similarly to how you're using lists to drill deeper into the contacts database you can use events to drill deeper into online behaviour on your website. Instead of just focusing on full page views, you can use events to track specific link clicks or as in this tutorial to track interactions with an embedded video. Events are extremely powerful and they can be used to track pretty much anything.
In this tutorial we're going to use the most flexible type of event: the custom JavaScript event.
If you would like to learn more about the different types of events that HubSpot offers, please read this article from the HubSpot Academy.
How to create a custom event?
There are two different ways to create custom events. The standard way is to go into the Events tool (Reports > Events) and to create the custom events directly in there (more about this in the HubSpot Academy).
In this case however, we're going to use a different approach: instead of manually creating the events first, we'll add the event code directly to the page where the Youtube video is embedded. As soon as such an event (eg. 'Play' button was clicked) is triggered for the first time, the system will automatically create an events report within the events tool.
Sounds confusing? Let's start and it will hopefully all make sense :-)
Are you an impatient developer who just wants to the see finished code? Skip.
1. Create a page with a custom HTML module
As this tutorial requires custom code, we need to use a page where we can easily add JavaScript. If you're using a HubSpot Website page or Landing page for this, then I recommend to use a template with a 'Custom HTML' module. The custom HTML module will contain the code for the video itself and also all the events code.
2. Taking a look at the Youtube Player API
As an embedded Youtube video is actually still hosted on Youtube - the video on your website is essentially just a window into a Youtube page - we need to interact with the Youtube Player API in order to be able to track the behaviour of the user. The Youtube Player API offers a lot of different options but we'll focus on only 2 aspects: we want to trigger an event when
- a video is started
- a video is finished
Most of the code that we need is within the 'Get Started' section of the Youtube Player API documentation. The great news is that we can simply copy and paste most of the code. The only thing we need to change from the first part of the code is the video ID (see red arrow underneath). You can find the ID of your video in the Youtube URL. Eg:

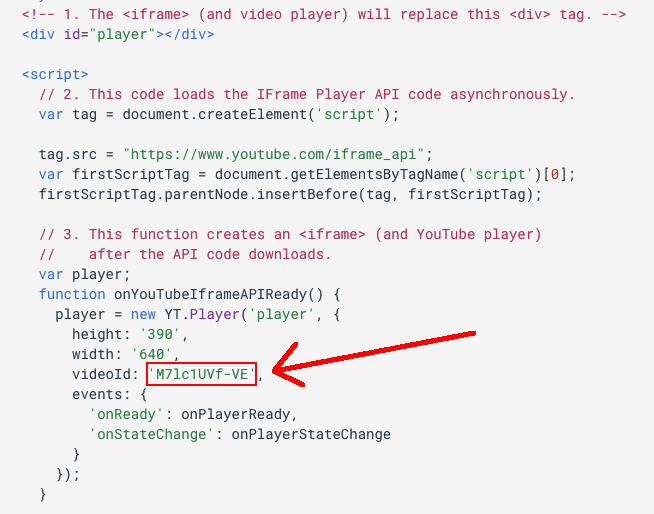
(Image Source: Youtube)
Let's take a closer look at what happens in the above code:
The first part of the code creates an empty <div> tag as a placeholder. This will be replaced with an iframe (which contains the video itself) when the page loads. You could use a different id instead of "player" if you like but I recommend that you stick with it to keep it as simple as possible.

You can ignore the next bit but the 3rd part is important again:
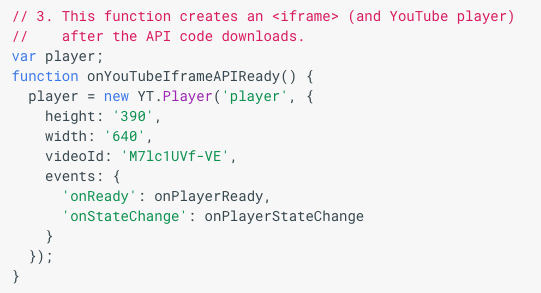
This code creates the actual iframe with the video. Here you can change the height and width and select the correct Video ID.
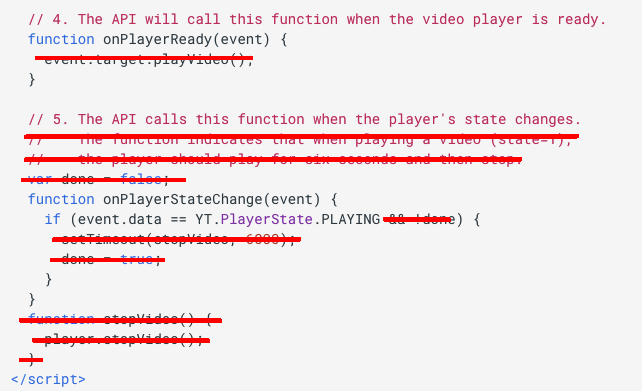
From the remaining part of the sample code, you only need to keep a few bits and pieces:
(Image Source: Youtube)
The most important piece is ![]() .
.
Whatever follows this code will be executed when the play button is pressed. The Youtube Player API lists some more player states which can be used the same way:
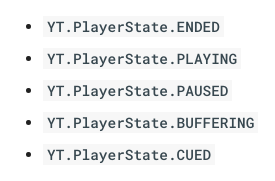
For our use case, we only need to know the first two states: ENDED and PLAYING.
3. Copy and Paste!
Let's grab all the sample code from the Youtube documentation and adapt it as shown above. For ease of use I went ahead and implemented all the changes for you, so you can simply copy it from here:
<!-- 1. The <iframe> (and video player) will replace the <div> tag. -->
<div id="player"></div>

<script>
    // 2. This code loads the iframe Player API code asynchronously.
    var tag = document.createElement('script');
    tag.src = "https://www.youtube.com/iframe_api";
    var firstScriptTag = document.getElementsByTagName('script')[0];
    firstScriptTag.parentNode.insertBefore(tag, firstScriptTag);

    // 3. This function creates an <iframe width="640" height="390"> (and YouTube player)
    //    after the API code downloads.
    var player;
    function onYouTubeIframeAPIReady() {
        player = new YT.Player('player', {
            height: '390',
            width: '640',
            videoId: 'eVCVNogpvRQ',
            events: {
                'onReady': onPlayerReady,
                'onStateChange': onPlayerStateChange
            }
        });
    }

    // 4. The API will call this function when the video player is ready.
    function onPlayerReady(event) {}

    // 5. The API calls this function when the player's state changes.
    function onPlayerStateChange(event) {
        if(event.data == YT.PlayerState.PLAYING) {
            // TODO: write the code that will execute when the play button is pressed
            console.log("video playing");
        }
        if(event.data == YT.PlayerState.ENDED) {
            // TODO: write the code that will execute when the video ends
            console.log("video ended");
        }
    }
</script>
As you can see, I also added some code for the ENDED player state (line 35).
Once you paste all that code into your website page or into your HubSpot custom HTML module, you should see the embedded video show up on the page. I'm using a video of my old friends, the RTE Concert Orchestra, where they play the march from Superman (extra points are available to whoever recognises the handsome timpanist in the back right corner).

Make sure to replace this video with your own video as described earlier (videoID on line 18 needs to be updated)
Before we add any more code, let's make sure that this code actually works.
4. Testing the Youtube Code
JavaScript offers a very easy way to test code: with the console.log() function you can write text into your browser console. I went ahead and already added the test code to the above code. Lines 33 and 37 have no other purpose than to write two words (eg. "video ended") to the browser so we can see if the code works.
- Get the shareable preview URL of your unpublished page and paste it into a browser window
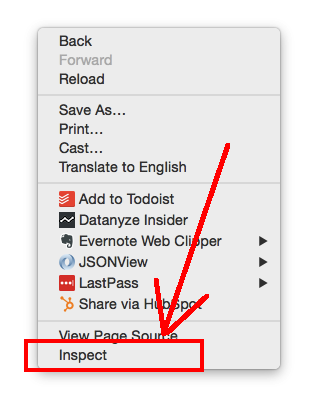
- Open the console of your browser. If you're using Chrome you can open it by right-clicking on the page and then selecting 'Inspect' at the bottom. For other browsers, follow these instructions.
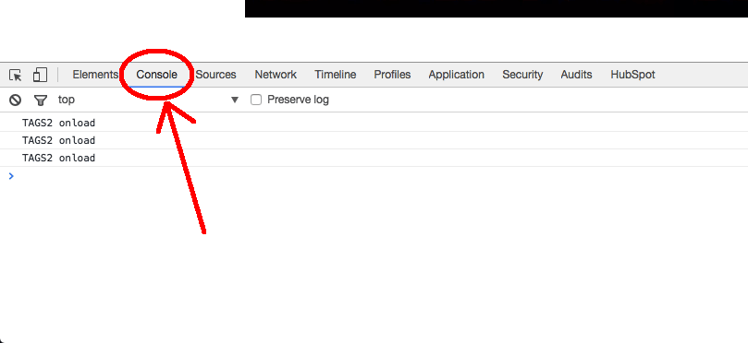
- Click on the 'Console' tab. It should look similar to this (probably totally empty)
- Now start the video. As soon as you do, you should see 'video playing' being written into the console
- Scroll to almost the end of the video and let it finish by itself. You should see 'video ended' being written.
Your console should now look similar to this:

Great news! Everything works as expected. Let's move on to the main part:
5. Creating events for PLAYING and ENDED
In order to be able to trigger an event, we need to take a look at how such event code needs to be structured. The following screenshot is from our developers documentation. Another good way to learn more about this is to create a sample custom JavaScript event within the events tool itself.
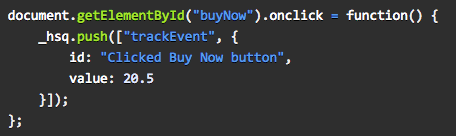
We can ignore the first line of code as we already have our condition (PLAYING etc). We can also ignore line 4 as we won't use a value (this is only meant for revenue purposes). The important part is on line 2 and 3:
- _hsq.push(["trackEvent', etc. fires the event itself
- id: "something" defines under what ID the event is stored. In our case the ID will also be used as the title of the automatically created event. This will be important for lists, workflows and it will also be visible on the contact timelines.
If we adapt this for our case it will look something like this:
    _hsq.push(["trackEvent", {
        id: "Superman Video Played",
        value: null
    }]);
Now that we know how the code needs to be written, let's insert the events into the existing code:
    // 5. The API calls this function when the player's state changes.
    function onPlayerStateChange(event) {
        // trigger event when the 'play' button is pressed
        if(event.data == YT.PlayerState.PLAYING) {
            _hsq.push(["trackEvent", {
                id: "Superman Video Played",
                value: null
            }]);
            console.log("video playing"); // only for testing
        }
        // trigger event when the video finishes
        if(event.data == YT.PlayerState.ENDED) {
            _hsq.push(["trackEvent", {
                id: "Superman Video Ended",
                value: null
            }]);
            console.log("video ended"); // only for testing
        }
    }
And that's it!
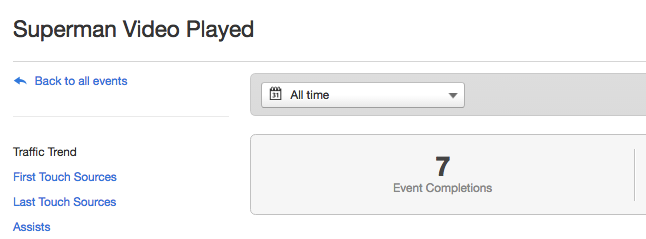
Run the same test again as in step 4 and you're good to go. (Re)publish the page, trigger the events by playing and ending the video and make sure the event shows up within the HubSpot portal:
- Go to Reports > Events and find the new event report
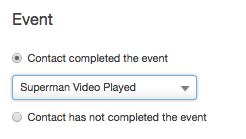
- Go to lists and workflows and make sure the new events show up as extra options
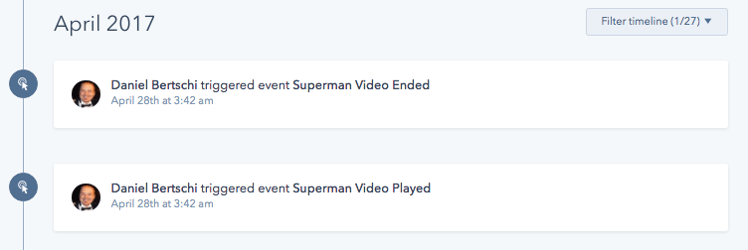
- Test with a known contact (cookie and email address connected) that the event shows up on the contact's timeline.
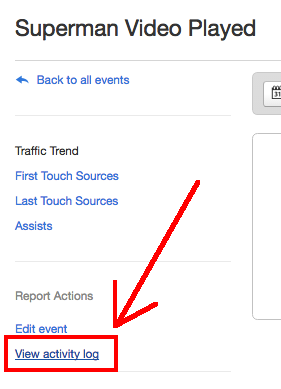
Please note that not all of this will happen in realtime. It can take some time before the events will show up in the report. The rest should be pretty quick. If you're impatient you can access the unprocessed event logs by opening the event > View activity log (bottom left).

Optional: Only trigger the PLAYING event the first time
There is nothing wrong with the previous code, however it's important to understand that it will trigger the 'playing' event everytime the button is clicked. If somebody plays and pauses the video a few times, the event will fire multiple times. This can lead to problems as it can potentially clutter up the contact's timeline and also skew the analytics.
Instead, I would prefer if the event only triggered the first time when somebody clicks on the button (= when the video starts). So how do we do that?
All we need is a simple variable of type true/false (this is known as 'boolean' in programming lingo). It's the equivalent of a single checkbox property in HubSpot (which is actually represented as a boolean variable behind the scenes). We're going to use this boolean variable as a flag to indicate whether the video is played for the first time or not.
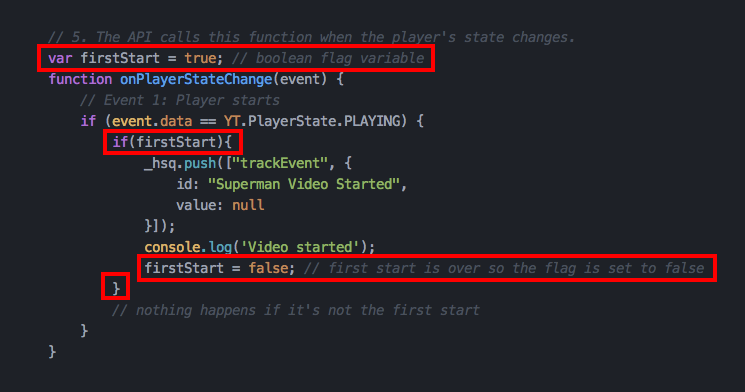
All the changes are marked in red in the screenshot underneath:
- first we create the boolean flag variable and set it to true. Make sure that you always use VERY clear naming conventions - this is particularly important for boolean variables. It should always be self explanatory
- we're wrapping the event code with a second if statement to check if it is the first time that the video is played.
- just after the console.log code, we'll add a new line of code which changes the value of the flag variable to false.
- VERY IMPORTANT: don't forget the closing } bracket on the next line
And here the updated version of the code for copy & paste:
// 5. The API calls this function when the player's state changes.
    var firstStart = true; // boolean flag variable

    function onPlayerStateChange(event) {
        // trigger event when the 'play' button is pressed
        if(event.data == YT.PlayerState.PLAYING) {
            if(firstStart){
                _hsq.push(["trackEvent", {
                    id: "Superman Video Played",
                    value: null
                 }]);
                console.log("video playing"); // only for testing
                firstStart = false; // first start is over so the flag is set to false
            }
        }
        // trigger event when the video finishes
        if(event.data == YT.PlayerState.ENDED) {
            _hsq.push(["trackEvent", {
                id: "Superman Video Ended",
                value: null
            }]);
            console.log("video ended"); // only for testing
        }
    }
Finally the full finished product once again for copy&paste in case you're nervous that you missed a little change:
<!-- 1. The <iframe> (and video player) will replace the <div> tag. -->
<div id="player"></div>

<script>
    // 2. This code loads the iframe Player API code asynchronously.
    var tag = document.createElement('script');
    tag.src = "https://www.youtube.com/iframe_api";
    var firstScriptTag = document.getElementsByTagName('script')[0];
    firstScriptTag.parentNode.insertBefore(tag, firstScriptTag);

    // 3. This function creates an <iframe width="300" height="150"> (and YouTube player)
    //    after the API code downloads.
    var player;
    function onYouTubeIframeAPIReady() {
        player = new YT.Player('player', {
            height: '390',
            width: '640',
            videoId: 'eVCVNogpvRQ',
            events: {
                'onReady': onPlayerReady,
                'onStateChange': onPlayerStateChange
            }
        });
    }

    // 4. The API will call this function when the video player is ready.
    function onPlayerReady(event) {}

    // 5. The API calls this function when the player's state changes.
    var firstStart = true; // boolean flag variable
    function onPlayerStateChange(event) {
        // trigger event when the 'play' button is pressed
        if(event.data == YT.PlayerState.PLAYING) {
            if(firstStart){
                _hsq.push(["trackEvent", {
                    id: "Superman Video Played",
                    value: null
                 }]);
                console.log("video playing"); // only for testing
                firstStart = false; // first start is over so the flag is set to false
            }
        }
        // trigger event when the video finishes
        if(event.data == YT.PlayerState.ENDED) {
            _hsq.push(["trackEvent", {
                id: "Superman Video Ended",
                value: null
            }]);
            console.log("video ended"); // only for testing
        }
    }
</script>
That's all, folks! I'm looking forward to your comments!
P.S. If you're a developer you may wonder why I used an additional if statement instead of just adding a 2nd condition to the existing one. Clearly the following code would have been tidier:

Well, you'll find out the reason in my next post :-)
