Did you ever target a list of freshly imported contacts with an email which contained a link/CTA to a landing page and wondered why the form didn't automatically fill in any of the known information? Wouldn't it be nice if the form could be pre-populated exactly the same way as for contacts who previously filled out a form? Yes, it would be and it can be done! Here are step by step instructions how you can easily implement this.

Let's start by taking a quick look at how form pre population actually works:
How pre population of a HubSpot form works
We all know and love the great features that the HubSpot forms have to offer. Amongst them:
- Known values are automatically populated
- Smart fields with known values can automatically be replaced with different questions. This allows to progressively profile your leads (HubSpot Professional and Enterprise packages).
All of this works out of the box because of the HubSpot tracking code. HubSpot drops a cookie when somebody visits your site for the first time. Going forward, the system can then reference the usertoken in the cookie to serve dynamic content and smart CTAs or to greet him/her with a personalised message. The pre population of the HubSpot forms works exactly the same way: Based on the usertoken in the cookie, the system knows who the visitor is and only displays the questions that haven't been filled out yet. Additonally, known fields which are not smart are pre filled with the known values. A good example for the latter is the email address field. As the email address is the unique identifier in the HubSpot database, it should always be visible on the form.
Why does it not work for offline contacts?
There are two ways to associate a contact with a cookie:
- Form submission (either through a "normal" HubSpot form or through a custom form which is hooked up to HubSpot via our Forms API)
- A click on a tracked email sent out through Hubspot. Important: the link needs to go to a page that has the HubSpot tracking code on it.
When contacts are imported into the HubSpot database, created manually directly in the Contacts tool or created in HubSpot as a result of syncing over from a CRM, the system has no way of associating their online behaviour (= the cookie) with the contact in the database until one of the above takes place (form submission or email click). Thus, when such a contact comes to a HubSpot Landing Page, the form will not be pre-populated.
So how do we do it?
Instead of using the cookie to pre-fill the form, we're going to use a different approach which involves personalization tokens and URL query parameters. Sounds scary? Just follow these step by step instructions and it will be a breeze:
- Get the URL of the Landing Page that you want to link to. Eg. info.laptoptimpanist.com/demo-landingpage
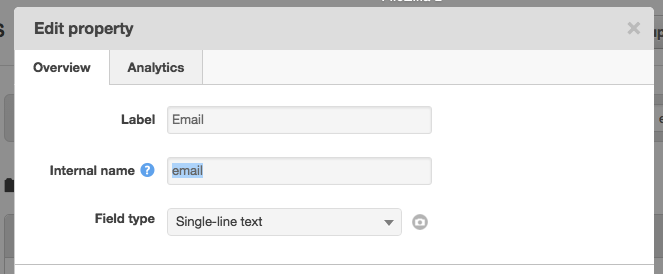
- Write down the internal names of all the properties that you would like to pre-fill in the form. The internal names of most built-in properties are very straightforward (eg. for first name it is "firstname"). If you're using custom properties in the form which you would like to pre-fill, go to Contacts > Contacts Settings and click on the relevant custom property to find the internal name. Here is an example for the email property:

- Start adding query parameters to the URL of the Landing page.
- Firstly, we'll add a question mark to the end of the URL. This acts as the separator between the parameters and the address of the Landing Page. eg. info.laptoptimpanist.com/demo-landingpage?
- Let's start adding the names of the form fields after the question mark. We're using the following structure: fieldname=. Many of you will recognise the brackets from the personalization tokens in emails etc. This is exactly what we're doing here: We're adding the personalization tokens to the URL. When the email is sent out, the tokens in the URL will be replaced with the recipient's details and when he/she clicks on the link, the magic happens: the form will be filled with the users information.
- Here is a full example (broken down into separate lines for easier reading). As you can see, we use the ampersand sign (&) to add multiple properties to the URL:

- The full URL string looks like this:

- The only thing left to do now is to add this long URL to a link or to a clickable image in the email.
- All done.
Please note the following:
- The order of the properties in the URL doesn't matter. It can be different from the order of appearance in the form.
- The approach described here does not work with CTAs due to the extra tracking layer that CTAs are wrapped in. Use a simple link or a clickable image instead.
- Special tip: if you like the simplicity of building a CTA with HubSpot you can get an image version (.png) of a CTA by simply dragging it from the CTA dashboard onto the computer desktop. You can then upload the PNG into the file manager and use it as a clickable image in your email.
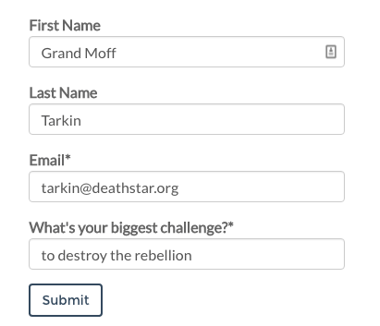
- If you would like to see a quick demo of the behaviour described above, simply click on the following sample URL and see for yourself how the parameters in the URL get automatically put into the form fields: http://info.laptoptimpanist.com/demo-landingpage?firstname=Grand%20Moff&lastname=Tarkin&email=tarkin@deathstar.org
- btw: '%20' is commonly used in URLs to represent an empty space between two words.
If you would like to learn more about using URL parameters and their various benefits, check out this excellent blog post from my colleague Zack Wolfson on the official HubSpot Customer Blog.


